Did you know that over 70% of Americans who try DIY projects find it both rewarding and cost-effective? If you’ve been looking for a fun and practical way to start your DIY journey, you’re in the right place. I’m excited to share my comprehensive guide to using woodworking wine rack plans.
This guide combines creative design with practical skills, using accessible tools and materials like wood. Whether you’re a seasoned crafter or just starting out, this step-by-step process will make your project enjoyable and stress-free. Plus, using recycled or upcycled wood can add a unique touch to your creation.
From cutting to finishing, I’ll walk you through every essential step. Let’s dive into this DIY adventure together and build something you’ll be proud to display in your home.
Key Takeaways
- Beginner-friendly guide with step-by-step instructions.
- Uses common materials like wood and basic tools.
- Customizable design to fit your space and style.
- Option to use recycled or upcycled wood for a unique look.
- Perfect for showcasing your creativity and practical skills.

My DIY Journey with Wine Rack Woodworking Plans
Discovering the world of DIY was a turning point in my creative life. It all started with a simple idea: to build something functional and beautiful. I was also looking for woodworking ideas to make money. That’s when I stumbled upon the concept of creating a wine rack. It seemed like the perfect project to combine practicality with aesthetics.
Like many beginners, I faced challenges. Learning to work with wood was intimidating at first. But with each step, I gained confidence. I spent hours researching online, gathering ideas, and studying project plans. This initial research was crucial in helping me understand the process and avoid common mistakes.
What drew me to this project was its versatility. A wine rack isn’t just a storage solution; it’s a statement piece. It adds character to any space while serving a practical purpose. Plus, the blend of creativity and technical work made it an exciting challenge.
For beginners, having clear, step-by-step instructions is essential. It’s what helped me stay on track and complete my first project successfully. In the sections that follow, I’ll share everything I learned, from tools and materials to finishing touches. Let’s dive into this rewarding DIY adventure together!
Tools and Materials for a Successful Project
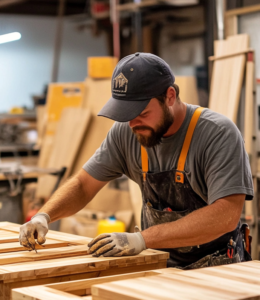
Starting a DIY project can feel overwhelming, but having the right tools makes all the difference. In this section, I’ll walk you through the essentials you’ll need to create a sturdy and stylish piece. From cutting to assembling, every step requires precision and the right equipment.

Essential Tools Overview
First, let’s talk about the tools you’ll need. A table saw is a must for making clean, accurate cuts. It’s perfect for shaping your wood into the right dimensions. Pair it with a drill for creating holes and securing screws. These two tools are the backbone of your project. I acquired many of them when planning my DIY shelf ideas.
Safety is just as important as skill. Always use push sticks and auxiliary fences when working with a table saw. This ensures stability and reduces the risk of accidents. A level and measuring tape are also essential for keeping everything straight and precise.
“Safety isn’t just a priority; it’s a necessity. Always double-check your tools and workspace before starting.”

Choosing the Right Wood and Hardware
Selecting the right wood is crucial for both durability and appearance. I recommend using untreated, sturdy options like pine or cedar. These types of wood are easy to work with and look great when finished.
When it comes to hardware, choose screws that match the thickness of your wood. Clamps are also helpful for holding pieces together during glue-ups. Here’s a quick table to summarize the essentials:
| Tool/Material | Purpose |
|---|---|
| Table Saw | Cutting wood to size |
| Drill | Creating holes and securing screws |
| Measuring Tape | Ensuring accurate dimensions |
| Clamps | Holding pieces during assembly |
| Wood Screws | Securing pieces together |
With these tools and materials, you’re ready to tackle the next steps. In the following sections, I’ll guide you through cutting, assembling, and finishing your project. Let’s get started!
Selecting the Perfect Wood for Your Wine Rack
Choosing the right material is the foundation of any successful DIY project. When it comes to building a wine rack, the type of wood you select plays a crucial role in both durability and aesthetics. I’ve found that certain woods, like pine and cherry, strike the perfect balance between affordability and quality.
Pine is a great option for beginners. It’s easy to work with and budget-friendly, making it ideal for first-time projects. Cherry, on the other hand, offers a richer look and greater durability, though it’s slightly more expensive. Both types of wood can be stained or sealed to match your personal style.

For a unique touch, consider using reclaimed or sustainable wood. Not only does this add character to your project, but it’s also an eco-friendly choice. I’ve used reclaimed wood in several of my builds, and the natural grain and texture always make the final piece stand out.
When sourcing wood, local lumberyards or even repurposed materials can save you money. Look for straight, knot-free boards to ensure a smooth build. Remember, the right wood can elevate your wine rack from functional to a true centerpiece in your home. I learned this lesson with my end table woodworking project.
Preparing Your Wood: Resawing and Edge Smoothing
Preparing your wood is a critical step in ensuring a smooth and professional finish. Whether you’re working with pine or cherry, proper preparation sets the foundation for a successful project. In this section, I’ll walk you through resawing and edge smoothing techniques that will make your work easier and safer.
Table Saw Techniques and Safety Tips
Using a table saw is essential for resawing wood accurately. Always prioritize safety by wearing protective gear and keeping your workspace clean. I recommend using push sticks and auxiliary fences to maintain control and stability during the process.
When resawing, start by setting the blade height slightly above the wood’s thickness. This ensures a clean cut without unnecessary strain on the saw. Remember to feed the wood slowly and steadily to avoid kickback or uneven cuts.
Understanding Resawing Methods
Resawing involves cutting wood along its thickness to create thinner pieces. This technique is perfect for projects requiring multiple layers or a refined finish. For beginners, I suggest practicing on scrap wood to get a feel for the process.
Before resawing, remove any rounded edges from the wood. This step ensures a flat surface for better glue-up results. Use a stable push stick to guide the wood through the table saw, maintaining consistent pressure for an even cut.
Here are a few tips to keep in mind:
- Always double-check blade alignment before starting.
- Use clamps to secure the wood if needed.
- Keep your hands clear of the blade at all times.
By following these steps, you’ll achieve smooth, consistent edges ready for assembly. Remember, patience and precision are key to mastering this process.
Measuring and Cutting for a Precise Fit
Accuracy is the key to a flawless DIY project. Whether you’re a beginner or a seasoned crafter, precise measuring and cutting ensure your final piece looks professional and fits perfectly. In this section, I’ll share my tips for achieving consistent results every time.

Using a Speed Square for Accuracy
A speed square is one of the most versatile tools in my workshop. It’s perfect for marking straight lines and ensuring your cuts are at the right angle. To use it effectively, align the square with the edge of your wood and mark the desired size with a pencil.
Always double-check your measurements before making any cuts. Even a small error can throw off the entire project. I recommend measuring twice and cutting once to avoid mistakes.
Tips for Consistent Cuts
Consistency is crucial when cutting multiple pieces for your project. Here are a few tips to help you stay on track:
- Use a stable work surface to prevent the wood from shifting during cuts.
- Keep your saw blade sharp for clean, smooth edges.
- Mark all pieces at once to ensure they’re the same size.
Following these steps will save you time and frustration. Remember, patience and attention to detail are your best tools for success.

Constructing the Glue-Up Panel: Tips and Techniques
Creating a strong glue-up panel is a skill every DIY enthusiast should master. It’s the foundation of many projects, ensuring durability and a polished finish. In this section, I’ll share my step-by-step approach to achieving a seamless glue-up, from alignment to cleanup.

Proper Alignment and Clamping Methods
Start by aligning two pieces of wood for a clean glue-up panel. Use clamps to hold them together, ensuring even pressure across the surface. I recommend placing a piece of wax paper underneath to prevent glue from sticking to your workbench.
Here’s my go-to clamping method:
- Apply a thin, even layer of wood glue to both surfaces.
- Press the pieces together and secure them with clamps.
- Check alignment immediately and adjust if needed.
“Patience is key during the glue-up process. Rushing can lead to misalignment and a weaker final product.”
For added stability, I sometimes use a nail gun to secure end pieces after the glue has dried. This ensures the panel stays intact during the next steps of the project.
Cleanup and Finishing
Once the glue has set, it’s time to clean up any excess. I use a planer or sander to smooth the surface, starting with 120-grit sandpaper and finishing with 150-grit for a polished look. This step not only removes glue residue but also prepares the panel for staining or sealing.
Remember, careful clamping and attention to detail during the glue-up process will result in a more secure and lasting construction. Take your time, and you’ll be rewarded with a professional-quality panel for your project.
Mastering Slot Cuts: Saw Options and Techniques
Precision is the heart of any successful DIY project, especially when it comes to making slot cuts. Whether you’re crafting a functional piece or a decorative one, the right tool and technique can make all the difference. In this section, I’ll guide you through the best options for achieving clean, snug slots every time.

Band Saw, Jig Saw, or Router? Choosing the Best Tool
When it comes to slot cuts, you have several tool options. A band saw is ideal for straight, precise cuts, especially in thicker wood. It’s my go-to for projects requiring consistent depth and width. A jig saw, on the other hand, offers more flexibility for curved or intricate designs.
For the cleanest finish, I often recommend a router. With the right bit, it can create smooth, precise slots in just one pass. Each tool has its strengths, so consider your project’s needs before deciding.
“Choosing the right tool isn’t just about efficiency—it’s about achieving the perfect finish.”
Step-by-Step Guide to Perfect Slot Cuts
Here’s my simple step-by-step method for flawless slot cuts:
- Measure and mark the slot’s location carefully.
- Select the appropriate bit or blade for your tool.
- Make a single, steady pass to avoid removing too much material.
Remember, patience is key. Rushing the process can lead to uneven cuts or mistakes.
Tips for Selecting the Right Bit and Settings
The bit you choose depends on the wood type and the slot’s dimensions. For hardwoods, opt for a carbide-tipped bit to ensure durability. Adjust your tool settings based on the wood’s thickness and density.
Always test your setup on a scrap piece before working on the final project. This ensures the slot will be the correct width and depth.
Mastering slot cuts takes practice, but with the right tool and technique, you’ll achieve professional results. Take your time, and enjoy the process!
Assembling the Wine Rack: A Step-by-Step Guide
Assembling your project is where creativity meets precision. This stage transforms individual pieces into a functional and stylish rack. Let’s dive into the process of creating a crisscross pattern and ensuring a secure fit.
Creating a Crisscross Pattern
Start by laying out the pieces in a crisscross pattern. This design not only looks elegant but also provides stability. Test fit each piece to ensure the slots interlock smoothly. If adjustments are needed, use a chisel or sandpaper to refine the edges.
Here’s a quick guide to assembling the pattern:
- Align the vertical and horizontal pieces at 90-degree angles.
- Slide the slots together, ensuring a snug fit.
- Double-check alignment before securing with glue or screws.
“A well-fitted crisscross pattern is the backbone of a sturdy rack. Take your time to get it right.”
Ensuring a Snug Fit and Secure Assembly
Once the pattern is set, it’s time to secure the assembly. Use clamps to hold the pieces in place while the glue dries. For added stability, I recommend using screws at key joints. This ensures the structure remains solid over time.
Here’s a summary of the assembly steps:
| Step | Action |
|---|---|
| 1 | Test fit all pieces in the crisscross pattern. |
| 2 | Apply wood glue to the slots and interlock the pieces. |
| 3 | Secure with clamps and let the glue set for 30 minutes. |
| 4 | Reinforce joints with screws for added stability. |
Following these steps carefully will result in a rack that’s both functional and visually appealing. If any pieces don’t fit perfectly, don’t hesitate to make adjustments. A little patience goes a long way in ensuring a professional finish.
Finishing Touches: Sanding, Staining, and Sealing
The final steps of your project can truly elevate its appearance and durability. Sanding, staining, and sealing are essential for a polished look that protects your work. Let’s dive into the techniques that will make your creation stand out.
Pre-Stain Conditioning and Stain Selection
Before applying stain, sand the surface with 120-grit sandpaper for a smooth finish. This step removes imperfections and ensures even absorption. Pre-stain conditioner is a game-changer—it helps the stain penetrate uniformly, especially on porous wood like pine.
When choosing a stain, consider the natural grain of the wood. Darker stains highlight the grain, while lighter tones offer a more subtle look. Test the stain on a scrap piece to see how it interacts with the wood before applying it to your project.
Applying Finish for a Beautiful Look
Once the stain is dry, it’s time to seal the wood. I recommend using a polyurethane finish for durability and shine. Apply thin, even coats with a brush or cloth, sanding lightly between layers for a smooth finish.
Here’s a quick guide to finishing techniques:
| Step | Action |
|---|---|
| 1 | Sand the surface with 120-grit sandpaper. |
| 2 | Apply pre-stain conditioner and let it dry. |
| 3 | Test stain on scrap wood before application. |
| 4 | Seal with polyurethane in thin, even coats. |
These finishing touches transform a functional project into a standout piece of home decor. Take your time, and enjoy the process of bringing your creation to life!
Incorporating “Wine rack woodworking plans” for DIY Excellence
When I first started my DIY journey, I quickly realized the importance of having a solid plan. Using established wine rack woodworking plans can elevate your project from good to great. These plans provide a clear roadmap, minimizing errors and saving time.
There are many types of plans available online, from printable PDFs to detailed video tutorials. Whether you’re a beginner or an experienced crafter, starting with a tested plan ensures a smoother process. It’s like having a trusted guide by your side.
One of the biggest benefits of using a plan is the ability to customize it to fit your space and style. For example, you can adjust the dimensions or choose a different type of wood, like pine or cedar. This flexibility allows you to create something truly unique.
“A well-thought-out plan is the foundation of any successful project. It’s not just about following steps—it’s about making the project your own.”
Here’s a quick overview of the types of plans you might encounter:
| Type of Plan | Features |
|---|---|
| Printable PDF | Easy to follow, includes detailed measurements |
| Video Tutorial | Visual step-by-step guidance |
| Interactive Plans | Customizable dimensions and materials |
In my own projects, I’ve found that combining creativity with careful planning yields the best results. Whether you’re building a simple wine rack or a more complex design, starting with a solid plan sets you up for success.
Troubleshooting Common Challenges and Adjustments
Even the most carefully planned projects can hit a few snags along the way. Whether it’s a misfitting slot or an uneven glue-up, these challenges are part of the DIY process. The good news? With the right approach, you can easily overcome them and keep your project on track.
Dealing with Slot Fit Issues
One of the most common problems I’ve encountered is slots that don’t fit perfectly. This often happens when the cut isn’t precise enough. To fix this, I recommend revisiting the table saw and making adjustments. Here’s how:
- Measure the slot again to ensure accuracy.
- Use a table saw to carefully trim the edges.
- Test the fit after each adjustment to avoid over-cutting.
Patience is key here. Rushing can lead to more mistakes, so take your time to get it right.
Revisiting Cuts and Glue-Up Corrections
Another issue I’ve faced is uneven glue-ups. This can throw off the entire alignment of your project. To fix this, start by checking the alignment of the pieces. If they’re off, use clamps to hold them in place while the glue dries.
Here’s a quick step-by-step guide:
- Loosen the clamps and realign the pieces.
- Apply a small amount of glue to the joints.
- Secure with clamps and let it dry completely.
“A little adjustment can make a big difference. Always double-check your work before moving to the next step.”
If the problem persists, consider using a screw to reinforce the joint. This adds extra stability and ensures a secure fit.
Throughout the process, I’ve learned that attention to detail is crucial. Measuring and retesting frequently helps catch errors early. And remember, every challenge is an opportunity to refine your skills and improve your final product.

Customization and Modular Design Ideas
Customizing your project can make it truly one-of-a-kind. Whether you’re working with limited space or want to add a personal touch, modular designs offer endless possibilities. I’ve found that adjusting the size and measure of individual pieces can transform a simple design into something elegant and functional.
Exploring Expandable and Elegant Designs
One of my favorite aspects of DIY projects is the ability to create expandable designs. For example, you can start with a small cabinet and add sections as your needs grow. This approach not only saves space but also allows for future adjustments.
Here are some ideas to inspire your design:
- Adjust the height or width of each piece to fit your space perfectly.
- Incorporate additional storage, like shelves or drawers, for added functionality.
- Use sturdy footings to enhance stability and add a polished look.
“Modular designs are all about flexibility. They allow you to adapt your project to fit your lifestyle and space.”
Small changes, like tweaking the dimensions of a piece, can have a big impact. For instance, slightly widening the base can create a more balanced appearance. Similarly, adding decorative footings can elevate the overall design.
If you’re working with a cabinet, consider integrating glass doors or LED lighting. These features not only enhance the aesthetic but also make your project more functional. The key is to experiment and find what works best for your vision.
By focusing on customization and modularity, you can create a project that’s both practical and uniquely yours. Take your time, explore different options, and enjoy the process of bringing your ideas to life.
Start Building Your Wooden Wine Rack Today
Building something with your own hands is a rewarding experience that combines creativity and practicality. Throughout this project, I’ve learned that attention to detail and patience are key to achieving professional results. From selecting the right wood to ensuring precise measurements, every step plays a crucial role in the final outcome.
One of the most important lessons is the value of customization. Adjusting the size or design to fit your space and style can transform a simple piece into something truly unique. Whether you’re using a table saw or a screwdriver, taking your time with each step ensures a sturdy and attractive result.
I encourage you to embrace the challenges along the way. Each obstacle is an opportunity to learn and improve. With the right tools and a bit of creativity, you can turn this project into a fulfilling and enjoyable experience. Thank you for joining me on this DIY journey—I can’t wait to see what you create!
FAQ
What tools do I need to start this project?
I recommend having a table saw, drill, speed square, and clamps. These are essential for precise cuts and secure assembly.
How do I choose the right wood for my project?
I prefer using hardwoods like oak or maple for durability. Make sure the wood is straight and free of knots for a clean finish.
What’s the best way to ensure accurate cuts?
I always use a speed square to mark my measurements and double-check before cutting. Taking my time here saves me from mistakes later.
Can I use a jig saw instead of a band saw for slot cuts?
Yes, you can! I’ve used both, and while a band saw is faster, a jig saw works well with careful handling and a steady hand.
How do I fix a slot that’s too tight or loose?
I usually sand the edges slightly for a tight fit or recut the slot if it’s too loose. Patience is key here.
What’s the best finish for a polished look?
I love using a pre-stain conditioner followed by a rich wood stain. A clear sealant adds protection and enhances the natural grain.
Can I customize the design to fit my space?
Absolutely! I’ve created modular designs that can expand or adjust to fit different areas. It’s a great way to make it uniquely yours.
How do I ensure the pieces align perfectly during assembly?
I use clamps to hold everything in place and check alignment with a square. Taking my time here ensures a snug and secure fit.