Did you know that over 60% of people who try their first DIY project feel more confident to tackle bigger challenges? That’s exactly how my journey began. Starting with small, practical creations like a wooden chopping board or a serving tray, I discovered how rewarding it is to use woodworking plans for beginners.
Whether you’re looking to add functional pieces to your home or explore your creative side, there’s a basic woodworking project for everyone. From benches to magazine storage, these ideas are perfect for anyone just starting out. The best part? You don’t need expensive tools or years of experience to get started.
In this guide, I’ll share my favorite DIY ideas and tips to help you build confidence while creating something beautiful. Let’s dive in and explore the possibilities together!
Key Takeaways
- Starting with simple projects builds confidence and skills.
- Practical items like chopping boards and benches are great for beginners.
- DIY projects can enhance both functionality and aesthetics in your home.
- You don’t need expensive tools to get started.
- Personalized creations make thoughtful gifts.
Introduction: My Journey into Woodworking
I never imagined that building a simple shelf would lead to such a rewarding hobby. It all began when I needed a storage solution for my small apartment. With limited space, I decided to try my hand at creating something functional. That first project ignited a passion I didn’t know I had.
My early projects were far from perfect. I remember struggling to measure accurately and fumbling with tools. But each mistake taught me something new. Building a shelf for my books was my first real success. It wasn’t fancy, but it was mine, and it worked perfectly.
How I Got Started
I started with basic tools—a saw, a hammer, and some nails. My first project was a small shelf for my kitchen. It wasn’t perfect, but it held my spices and gave me a sense of accomplishment. From there, I moved on to a storage bench for my entryway. Each project built my confidence and skills.
Challenges were part of the process. I remember cutting a piece of wood too short and having to start over. But every mistake was a lesson. Over time, I learned to measure twice and cut once. I also discovered the importance of using the right tools for the job.
What You Can Expect from This Guide
This guide is designed to help you start your own journey. I’ll share the tools and techniques I’ve learned along the way. You’ll find step-by-step instructions for projects like a shelf, a storage bench, and more. Each project is beginner-friendly and designed to build your skills gradually.
Here’s a quick overview of my early projects and what I learned from them:
| Project | Outcome | Lesson Learned |
|---|---|---|
| Kitchen Shelf | Held spices and small items | Measure twice, cut once |
| Storage Bench | Added seating and storage | Use the right tools for the job |
| Book Shelf | Organized my books | Patience leads to better results |
Whether you’re looking to build a shelf, a storage solution, or something else entirely, this guide will support you every step of the way. Let’s get started!
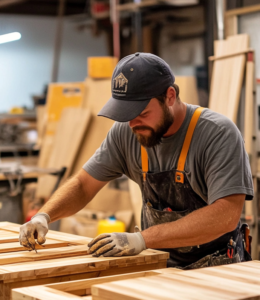
Getting Started with Essential Tools and Safety
Starting with the right tools and safety knowledge can make all the difference in your DIY journey. Whether you’re building a simple shoe rack woodworking project or a chopping board, having the essentials ensures a smooth and enjoyable experience. Let’s explore the tools you’ll need and the safety practices to keep in mind.

Basic Tools Every Beginner Needs
You don’t need a fancy workshop to get started. A few basic tools can help you complete most projects. Here’s what I recommend:
- Saws: A miter saw or a Japanese back saw is perfect for precise cuts.
- Drills: A cordless drill or an eggbeater drill is handy for making holes.
- Measuring Tools: A tape measure, marking gauge, and 6-inch ruler ensure accuracy.
- Workbench: A sturdy surface is essential for stability during projects.
When I first started, I invested in a simple table saw. It made cutting wood much easier and safer. Remember, it’s not about having the most expensive tools but the right ones for the job.
Safety Tips for First-Time Woodworkers
Safety should always come first. Here are some practices I’ve learned over time:
- Wear Protective Gear: Safety glasses and gloves are a must.
- Use Clamps: Secure your workpiece to avoid slips during cutting or sanding.
- Check Tools: Ensure your tools are in good condition before use.
- Work in a Well-Lit Area: Proper lighting reduces the risk of mistakes.
One of my early projects involved using water-resistant glue for a chopping board. I learned the hard way that even surfaces are crucial for a clean finish. Always measure twice and cut once!
Here’s a quick overview of the tools and safety gear every beginner should have:
| Tool | Purpose |
|---|---|
| Miter Saw | Precise cutting |
| Cordless Drill | Drilling holes |
| Tape Measure | Accurate measurements |
| Safety Glasses | Eye protection |
With these tools and safety tips, you’re ready to tackle your first project. Remember, every beginner starts somewhere, and the key is to enjoy the process while staying safe.
Understanding Basic Woodworking Techniques
Mastering basic techniques is the foundation of any successful DIY project. Whether you’re building a chopping board or a boot scraper, precision and attention to detail are essential. Let’s dive into the core skills that will help you create professional-looking pieces.
Measuring and Cutting with Precision
Accurate measurements are the first step to a flawless project. I always use a tape measure and a marking gauge to ensure every piece is the right size. For example, when I built a chopping board, I measured twice before making any cuts. This saved me from wasting materials and ensured a perfect fit.
When cutting, consistency is key. A miter saw or a Japanese back saw helps achieve clean, straight edges. Sharp blades reduce splintering, which is especially important for visible surfaces like a wall-mounted rack.

Gluing and Joining Pieces Effectively
Proper gluing and joining techniques ensure your project stays sturdy over time. For my boot scraper, I used water-resistant glue to bond the pieces together. Clamps held everything in place while the glue dried, preventing misalignment.
Here are some tips for effective joining:
- Apply glue evenly to avoid gaps.
- Use clamps to secure the pieces firmly.
- Wipe off excess glue immediately for a clean finish.
Common mistakes, like uneven surfaces or weak joints, can be avoided with careful preparation. Taking the time to measure, cut, and join accurately will save you from frustration later. This makes it easier to run a successful woodworking business.
Remember, even small details matter. A well-measured piece or a perfectly glued joint can elevate your project from amateur to professional. Start with these basics, and you’ll see how they transform your DIY creations.
Woodworking Plans for Beginners
Starting small with DIY projects can open up a world of creativity and practicality. Whether you’re looking to organize your space or add a personal touch to your room, simple projects are the perfect way to begin. Let’s explore some easy ideas and tips to get you started.

Simple Project Outlines
Here are a few beginner-friendly projects that are both functional and fun:
- Wooden Box: A versatile project that can be used for storage or decoration. It’s a great way to practice measuring and cutting.
- Magazine Storage Bins: Perfect for organizing clutter in your living room or office. These can be made with minimal materials.
- DIY Headboard: Add a custom look to your bedroom with a simple wooden headboard. It’s a great way to enhance your space.
These projects are designed to build your confidence while creating something useful. Start with one that fits your needs and skill level.
Planning Your First DIY Project
Before you begin, take time to plan. Here’s how to get started:
- Assess Your Space: Measure the area where your project will go. This ensures it fits perfectly and enhances your room.
- Gather Materials: Make a list of what you’ll need, including wood, tools, and hardware. Having everything ready saves time.
- Follow a Plan: Use project outlines as a roadmap. Simple steps reduce mistakes and build confidence.
For example, when I made my first wooden box, I carefully measured my space to ensure it fit on my shelf. Planning ahead made the process smooth and enjoyable.
Remember, the key to success is starting small and building your skills over time. With these tips and project ideas, you’re ready to create something amazing for your home.
Crafting a Wooden Chopping Board and Serving Tray
Creating a wooden chopping board and serving tray is a fantastic way to blend functionality with creativity in your kitchen. These projects are not only practical but also add a personal touch to your home. Whether you’re a first-time DIYer or looking to expand your skills, this guide will walk you through the process step by step.
Materials and Preparation
Before diving into the project, gather all the necessary materials. For the chopping board, you’ll need hardwood like maple or walnut, water-resistant glue, clamps, and sandpaper. The serving tray requires similar materials, plus handles if desired.
Start by selecting a piece of wood that’s at least 1 ½″ thick. Maple and walnut are excellent choices because they’re durable and visually appealing. Plan your design by sketching it out or using a book for inspiration. Measure twice and cut once to ensure precision.

Step-by-Step Assembly Process
Begin by cutting the wood into strips. For the chopping board, aim for 17 strips—14 maple and 3 walnut. Dry-fit the pieces to ensure they align perfectly. Use a 4-ft. steel ruler or yardstick to scribe arcs if needed.
Apply water-resistant glue evenly to the edges of each strip. Clamp them together firmly, ensuring proper alignment. Let the glue dry for a few hours for sections and overnight for the entire board. This step is crucial for durability.
Once the glue is dry, sand the surface starting with 80 grit and progressing to 220 grit. This minimizes the need for extensive sanding later. For the serving tray, flatten the surface with a hand plane and attach handles using a countersink bit.
Finish both pieces with an all-natural, food-safe oil. Reapply the oil regularly to maintain their beauty and functionality. These projects are perfect for enhancing your kitchen or gifting to loved ones.
DIY Storage Solutions: Shoe Organizers and Shelf Projects
Organizing your space doesn’t have to be complicated or expensive—DIY storage solutions can transform clutter into order. Whether you’re dealing with shoes piling up by the door or a lack of shelf space, creating custom storage units can make your home feel more functional and stylish.

Designing Functional Storage
When designing storage solutions, think about the specific needs of your space. For example, a shoe organizer can free up floor space in your entryway, while a wall-mounted shelf can provide a place for books or decor. Customizing your design ensures it fits perfectly and looks great.
One of my favorite projects is a simple plywood shoe organizer. It’s easy to build and can hold up to 12 pairs of shoes. Start by cutting plywood into 28.5-inch vertical boards and 12-inch horizontal pieces. Assemble them into a sturdy frame using pocket hole screws for durability.
Here’s a quick overview of the materials and tools you’ll need:
| Material/Tool | Purpose |
|---|---|
| Plywood (1×12 boards) | Shelves and frame |
| Pocket Hole Screws | Secure assembly |
| Clamps | Hold pieces in place |
| Sandpaper | Smooth edges |
Tips for Mounting on Walls
Mounting storage units securely is key to their functionality and safety. Use wall anchors or studs to ensure they stay in place. For a shoe organizer, position it near the door for easy access. A level and measuring tape will help you align everything perfectly.
If you’re working with scrap wood, consider repurposing it into stylish storage pieces. For example, old pallets can be turned into rustic shelves or coat racks. This not only saves money but also adds a unique touch to your home.
With a little creativity and effort, you can design storage solutions that meet your needs and enhance your space. Start small, and you’ll soon see how DIY projects can transform your home.
Building a Simple Wooden Bench for Beginners
Building a simple wooden bench can be a rewarding and practical addition to your home. It’s an easy build that doesn’t require advanced skills or expensive materials. Whether you’re looking to add seating to your patio or create a cozy spot indoors, this project is perfect for beginners.
Choosing the Right Lumber
Selecting the right lumber is crucial for a sturdy bench. I recommend using 2×12 and 2×4 boards, as they’re durable and widely available. Hardwoods like maple or oak are excellent choices for outdoor benches due to their resistance to weather. For indoor projects, pine is a cost-effective option that’s easy to work with.
When I built my first bench, I chose 2×12 boards for the seat and 2x4s for the legs. This combination provided the perfect balance of strength and simplicity. Always check for straight, knot-free boards to ensure a smooth construction process.
Measuring, Cutting, and Preparing the Wood
Accurate measurements are key to a successful project. Start by cutting the seat board to your desired length—typically 48 to 60 inches. For the legs, cut 2x4s to a height of 17 to 18 inches. Use a miter saw or circular saw for clean, precise cuts.
Before assembly, sand all edges to prevent splinters. I usually start with 80-grit sandpaper and finish with 220 grit for a smooth surface. Pre-drill holes for screws to avoid splitting the wood.
Essential Tools for the Job
Having the right tools makes the process much easier. Here’s what you’ll need:
- Miter Saw or Circular Saw: For precise cuts.
- Drill: To secure screws and pre-drill holes.
- Clamps: To hold pieces in place during assembly.
- Orbital Sander: For smoothing surfaces.
These tools are beginner-friendly and will help you complete the project efficiently.
Step-by-Step Assembly Guide
Follow these steps to assemble your bench:
- Attach the legs to the seat using 1.5-inch screws. Use clamps to hold them in place.
- Add cross supports between the legs for added stability.
- Sand the entire bench to ensure a smooth finish.
- Apply an outdoor oil-based polyurethane for protection and durability.
When I built my bench, I used a ton of wood glue alongside screws for extra durability. This simple technique ensures the bench lasts for years.
Design Tips for a Stylish Bench
To make your bench blend seamlessly with your decor, consider these design elements:
- Paint or Stain: Choose a color that complements your space.
- Decorative Edges: Use a router to add curved or beveled edges.
- Custom Length: Adjust the size to fit your specific needs.
These small touches can elevate your bench from functional to stylish.
Cost-Effective Tips
Building a bench doesn’t have to break the bank. Here’s how to keep costs low:
- Use Recycled Wood: Check construction sites or salvage yards for materials.
- Buy in Bulk: Purchase lumber in larger quantities for discounts.
- Minimize Waste: Plan your cuts carefully to use every piece of wood.
With these tips, you can create a professional-looking bench on a budget.
Magazine and Book Storage Ideas
Organizing your favorite reads doesn’t have to be a chore—DIY storage can make it fun and stylish. With a few simple tools and some creativity, you can create storage solutions that keep your books and magazines tidy while adding a decorative touch to your space.

One of my favorite projects is building magazine storage bins from a 2 ft. x 4 ft. sheet of plywood. This simple design is perfect for beginner woodworking and can be customized to fit your space. Start by cutting the plywood into four equal pieces for the bins. Use 1x4s for the sides and back to create a sturdy frame.
Here’s a quick guide to the materials and tools you’ll need:
| Material/Tool | Purpose |
|---|---|
| Plywood (1/4-in.) | Main structure for bins |
| 1×4 Boards | Frame and supports |
| Wood Glue | Secure joints |
| Clamps | Hold pieces in place |
When assembling the bins, pay attention to the holes or compartments where magazines will slide in. Precision is key to ensure they fit snugly. Use a jigsaw or circular saw for clean cuts, and sand the edges to prevent splinters.
For books, consider building a wall-mounted shelf with designated holes for each title. This not only keeps them organized but also turns your collection into a focal point. Use hardwood like oak or maple for durability and a polished look.
Here are some creative layout ideas to inspire you:
- Floating Shelves: Perfect for small spaces, these shelves can hold both books and decorative items.
- Modular Storage: Build stackable units that can be rearranged as your collection grows.
- Hidden Compartments: Add secret holes or drawers for storing smaller items like bookmarks or reading glasses.
Choosing the right wood is essential for both functionality and aesthetics. Hardwoods like walnut or cherry are durable and add a rich finish, while pine is a budget-friendly option. Avoid softwoods for heavy items, as they may warp over time.
Finally, don’t forget to sand and finish your project. A coat of varnish or paint not only protects the wood but also adds a personal touch. With these tips, you’ll create storage solutions that are as beautiful as they are practical.
Creating a Sleek Coat, Hat, and Wall Rack
Transforming your entryway into an organized and stylish space is easier than you think. A DIY coat, hat, and wall rack is the perfect beginner project to tackle. It’s simple, functional, and adds a personal touch to your home.
Customizing Hooks and Finishes
One of the best parts of this project is the ability to customize it to match your decor. Choose from a variety of hook designs—metal, wooden, or even vintage styles. For a modern look, consider sleek, minimalist hooks. If you prefer a rustic vibe, opt for distressed or matte finishes.
When selecting finishes, think about durability and aesthetics. A coat of Minwax Wipe-on Poly or Boiled Linseed Oil not only protects the wood but also enhances its natural beauty. Sand the surface up to 220 grit for a smooth finish before applying your chosen topcoat.

Step-by-Step Assembly
Start by cutting a 6 ft. 1×4 board to your desired length—30 inches is a great standard size. Use a drill to create 3/4-inch deep holes for the dowels. A drill press ensures precision, but a standard power drill works too. Attach the hooks using 3/8-inch dowels, leaving at least 3/4-inch space between them for accessibility.
Here’s a quick guide to the materials and tools you’ll need:
| Material/Tool | Purpose |
|---|---|
| 1×4 Board | Main structure |
| 3/8-inch Dowels | Hook attachment |
| Drill | Creating holes |
| Sandpaper (up to 220 grit) | Smoothing surfaces |
Mounting and Securing the Rack
For a sturdy installation, use a French cleat to mount the rack. This method distributes weight evenly, making it ideal for holding multiple coats and bags. Secure the rack with three screws—one on each end and one in the middle. Clamps are helpful during assembly to ensure pieces are seated properly.
Balancing form and function is key. Choose a finish that complements your decor while ensuring the rack is durable enough for daily use. With these tips, you’ll create an organizer that’s both practical and stylish.
Designing a Functional Spice Rack for Your Kitchen
A well-organized kitchen starts with a functional spice rack that’s both practical and stylish. This easy woodworking project is perfect for beginners and can be completed in just a few hours. Whether you’re looking to maximize cabinet space or add a decorative touch, a DIY spice rack is a great solution.

Step-by-Step Construction Guide
Start by gathering your materials. You’ll need ¾-inch plywood, wood discs, lazy Susan hardware, and brass rods. Measure and cut the plywood into pieces for the back, sides, shelves, and top/bottom. Each shelf should be spaced 5-¼ inches apart to accommodate standard spice jars.
Use a drill to create holes for the brass rods. Dry-fit the pieces to ensure everything aligns perfectly. Apply wood glue to the edges and secure the shelves with clamps. Let the glue dry for a few hours before moving on to the next step.
Here’s a quick overview of the materials and tools you’ll need:
| Material/Tool | Purpose |
|---|---|
| ¾-inch Plywood | Main structure |
| Brass Rods | Support for shelves |
| Lazy Susan Hardware | Rotating mechanism |
| Clamps | Secure assembly |
Finishing Touches for Durability
Once the rack is assembled, sand all surfaces to remove rough edges. Start with 80-grit sandpaper and finish with 220 grit for a smooth finish. Apply a shellac-based primer followed by two coats of paint for a polished look.
For added durability, consider using an all-natural, food-safe oil. This protects the wood and enhances its natural beauty. Reapply the oil regularly to maintain the finish.
With these steps, you’ll build a spice rack that’s both functional and visually appealing. It’s a simple project that can make a big difference in your kitchen organization.
Upcycling and Repurposing: Turning Scrap Wood into Art
Upcycling scrap wood is not just a craft—it’s a way to breathe new life into forgotten materials. As a perfect beginner project, it’s an opportunity to create something beautiful while reducing waste. With a little creativity, you can transform leftover wood into stunning decor pieces for your home.
One of the biggest benefits of upcycling is its environmental impact. In the U.S., around 10 million tons of wood waste are generated annually. By repurposing scrap wood, you’re not only saving money but also contributing to a more sustainable future. Plus, it’s a chance to add a personal touch to your space.
Here’s a step-by-step guide to creating a rustic shelf from scrap wood:
- Gather your materials: scrap wood, sandpaper, wood glue, and clamps.
- Cut the wood into equal-sized pieces for the shelves and supports.
- Sand all edges to prevent splinters and create a smooth finish.
- Assemble the shelf using wood glue and clamps, ensuring it’s level.
- Let it dry overnight, then add a coat of paint or stain for a polished look.
This simple woodworking project is ideal for beginners. It’s a great way to practice measuring, cutting, and assembling while creating something functional. Plus, it’s a reminder that even the smallest pieces of wood can be transformed into something meaningful.
For those looking to get even more creative, consider turning scrap wood into wall art. Smaller pieces, under 3 cm in size, can be arranged into intricate designs. Add textures like old buttons or glass beads for extra visual appeal. Hot glue works well for lightweight applications, holding up to 10 kg per square inch.
Here’s a quick overview of materials and tools you’ll need for a basic upcycling project:
| Material/Tool | Purpose |
|---|---|
| Scrap Wood | Main material for the project |
| Sandpaper (80-220 grit) | Smoothing surfaces |
| Wood Glue | Securing pieces together |
| Clamps | Holding pieces in place during assembly |
Upcycling is more than just a hobby—it’s a way to make a positive impact. Whether you’re building a rustic shelf or crafting wall art, each step is an opportunity to learn and grow. So, grab your tools and start transforming scrap wood into something extraordinary today!
Tips for Choosing Wood and Materials on a Budget
Finding quality materials for your projects doesn’t have to break the bank. With a little research and creativity, you can source affordable wood and supplies that still deliver professional results. Whether you’re building a furniture piece or a decorative hook, these tips will help you stay within budget while ensuring quality.
Local Sourcing and Budget-Friendly Options
One of the best ways to save money is by sourcing materials locally. Check out lumberyards, construction sites, or salvage yards for discounted or leftover wood. Many places sell offcuts or imperfect pieces at a fraction of the cost. I’ve found hidden gems like oak and maple this way, perfect for smaller projects.
Another great option is using construction-grade lumber. While it’s not as refined as hardwoods, it’s significantly cheaper and works well for furniture frames or outdoor projects. Plywood is another affordable choice, especially for larger surfaces. Radiata pine plywood, for example, costs about 60% less than oak plywood but still looks great when finished.

Evaluating Wood Quality
When shopping for wood, it’s important to know what to look for. Start by checking for straight, knot-free boards. Warped or cracked wood can be difficult to work with and may not hold up over time. Hardwoods like oak and maple are durable and ideal for furniture, while softwoods like pine are better for painted projects.
Here’s a quick guide to evaluating wood quality:
| Material | Best Use | Cost Comparison |
|---|---|---|
| Oak | Furniture, flooring | $$$ |
| Pine | Painted projects, frames | $ |
| Plywood | Large surfaces, shelves | $$ |
Creating a detailed plan before you start shopping can also save money. Measure your project carefully and list the exact materials you need. This prevents overbuying and ensures you stay on budget. With these strategies, you’ll be able to build beautiful, functional pieces without overspending.
Learning from Family Handyman Projects
One of the most rewarding aspects of DIY is learning from real-life projects and adapting them to fit your needs. Family Handyman has been a treasure trove of inspiration, offering practical ideas that I’ve tailored to my own space. Whether it’s a shoe storage solution or a desk organizer, these projects have taught me valuable techniques and sparked my creativity.
Inspiration from Real-Life Examples
Family Handyman projects often serve as a starting point for my own designs. For example, their shoe storage ideas inspired me to create a custom organizer for my entryway. Using a 4 ft. x 4 ft. sheet of plywood, I built a sturdy unit that holds up to 12 pairs of shoes. This project perfect example showed me how to maximize space while keeping things stylish.
Another favorite is their DIY organizers. I adapted their magazine storage bins to fit my desk area, using 1/4-in. plywood and 1x4s. This not only cleared clutter but also added a functional style to my workspace. These real-life examples have been instrumental in helping me refine my skills and think outside the box.
Adapting Techniques for Your Needs
One of the best lessons I’ve learned is the importance of adapting techniques to suit my specific needs. For instance, when building a desk organizer, I incorporated adjustable shelves to accommodate different-sized items. This flexibility ensures the unit remains useful as my needs evolve.
Style also plays a significant role in functionality. By choosing finishes that complement my decor, I’ve created pieces that are both practical and visually appealing. Family Handyman projects have taught me that every project perfect solution starts with thoughtful planning and a willingness to experiment.
Every project is a learning opportunity. Whether it’s a shoe organizer or a desk unit, I’ve gained confidence and improved my skills over time. By drawing inspiration from Family Handyman and adapting their techniques, I’ve been able to create functional, stylish solutions for my home.
Custom Furniture Projects for Your Home
Custom furniture projects can turn any house into a personalized haven. Whether you’re crafting a desk, table, or bench, these creations add functionality and style to your space. Over time, I’ve discovered that designing your own furniture is not only practical but also deeply satisfying.
Ideas for Desks, Tables, and More
When it comes to custom furniture, the possibilities are endless. A simple desk can transform a corner of your house into a productive workspace. I’ve found that using 2×4 boards is an affordable and beginner-friendly option. For a modern touch, consider adding adjustable shelves or a sleek finish.
Tables are another great project. A farmhouse-style table, for example, can be built for less than $20 and completed in an afternoon. This time-saving design is perfect for family gatherings or casual meals. Benches, too, are versatile. A sturdy bench can serve as seating, storage, or even a decorative piece in your entryway.
Time-Tested Designs and Personal Preferences
Renowned woodworkers often inspire my projects. Their designs are both innovative and accessible to beginners. For instance, I adapted a classic bench design to fit my house’s aesthetic. By choosing the right materials and finishes, I created a piece that’s both functional and stylish.
Here’s a quick comparison of popular furniture projects:
| Project | Cost | Time |
|---|---|---|
| Farmhouse Bench | Less than $20 | 1 afternoon |
| Desk | $70 | 1 day |
| Planter Box | $8 | 1 hour |
Balancing Functionality with Creative Design
Every piece of furniture should serve a purpose while reflecting your personal style. When designing a desk, I focus on storage solutions like drawers or cubbies. For a bench, I might add a hidden compartment for extra storage. These small details make a big difference in both functionality and aesthetics.
“The best furniture is not just beautiful—it’s also practical.”
Expressing Individual Style
Custom furniture projects are a great way to express your creativity. Whether it’s a unique desk or a cozy bench, each piece tells a story. Over time, you’ll develop your own style and techniques, making each project even more rewarding.
With these ideas and tips, you’re ready to start creating furniture that transforms your house into a space that’s truly yours. Happy building!
Creative Outdoor Woodworking Projects for Small Spaces
Even the smallest outdoor area can shine with thoughtful design and DIY projects. Whether you’re a seasoned woodworker or just starting out, there are plenty of ways to maximize your space. From planter boxes to floating shelves, these ideas combine functionality with style to create a personal sanctuary.
Planter Boxes: A Stylish Solution
Planter boxes are a fantastic way to add greenery to your outdoor space. They’re perfect for small patios or balconies and can be customized to fit your organization needs. Start by choosing durable wood like cedar or redwood, which resists rot and weather damage.
Here’s a quick guide to building a simple planter box:
- Cut the wood into four equal pieces for the sides and bottom.
- Assemble the box using wood glue and screws for extra durability.
- Drill drainage holes in the bottom to keep plants healthy.
- Sand the edges for a smooth finish and apply a weather-resistant sealant.
This project is ideal for anyone who wants to want build something practical and beautiful. Plus, it’s a great way to practice basic woodworking skills.
Outdoor Shelves: Maximize Vertical Space
When floor space is limited, think vertically. Floating shelves are a stylish and functional addition to any outdoor area. They’re perfect for displaying plants, decor, or even small gardening tools.
Here’s how to create a simple outdoor shelf:
| Material | Purpose |
|---|---|
| 1×6 Board | Main shelf surface |
| L Brackets | Secure shelves to the wall |
| Weatherproof Stain | Protect wood from the elements |
Start by cutting the board to your desired length. Attach the L brackets to the wall, ensuring they’re level. Secure the shelf to the brackets and finish with a weatherproof stain. This project is perfect for a woodworker looking to add both style and organization to their outdoor space.
Design Tips for Small Spaces
When working with limited space, every detail matters. Choose multi-functional pieces, like a bench with built-in storage or a planter box that doubles as a divider. Use light-colored wood or paint to make the area feel larger and more open.
Durability is key for outdoor projects. Always use weather-resistant materials and finishes to ensure your creations last. With a little creativity, even the smallest outdoor area can become a place you want build memories in.
Start Building Your Beginner Wood Project Today
Every journey begins with a single step, and your DIY adventure is no different. Throughout this guide, I’ve shared tips and techniques to help you create functional and stylish pieces, even as a beginner. With the right tools and a bit of practice, you can project make like a pro in no time.
Remember, the key to success is starting small and building your skills over time. Whether it’s a simple shelf or a custom bench, each project teaches something new. Don’t be afraid to experiment and make mistakes—they’re part of the learning process.
I encourage you to take the leap and start your next project make. Share your creations and stories with others—it’s a great way to stay inspired and connect with a community of like-minded DIYers. You’ve got the tools, the knowledge, and the creativity to succeed. Now, go out there and build something amazing!
FAQ
What tools do I need to start my first DIY project?
You’ll need basic tools like a saw, drill, measuring tape, and sandpaper. These essentials help you measure, cut, and assemble pieces with ease.
How do I ensure safety while working on my project?
Always wear safety goggles, gloves, and a dust mask. Keep your workspace clean and follow tool instructions carefully to avoid accidents.
What’s the best way to measure and cut wood accurately?
Use a reliable measuring tape and mark your cuts with a pencil. Double-check measurements before cutting to ensure precision.
Can I build a shelf without advanced skills?
Absolutely! A simple shelf is a great beginner project. Start with basic designs and follow step-by-step guides to build confidence.
How do I choose the right wood for my project?
Opt for softwoods like pine for beginners. They’re affordable and easy to work with. Check for straight, knot-free boards for best results.
What’s an easy project to organize my kitchen?
A spice rack is perfect! It’s functional, simple to build, and helps declutter your countertops or cabinets.
How can I mount a wall rack securely?
Use a stud finder to locate wall studs and anchor screws into them. This ensures your rack stays sturdy and can hold weight.
Can I repurpose scrap wood for projects?
Yes! Scrap wood is great for small projects like planters or wall art. Sand it down and get creative with finishes.
What’s a good outdoor project for small spaces?
A planter box is ideal. It’s compact, adds greenery, and can be customized to fit your outdoor area.
How do I add a professional finish to my project?
Sand the surface smooth and apply a coat of paint or stain. Finish with a sealant for durability and a polished look.