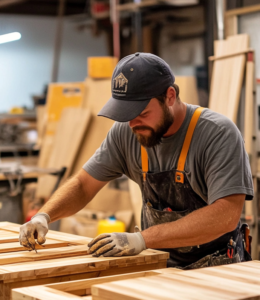
Did you know the average American household owns over 20 pairs of footwear? That’s a lot of clutter to manage! I found myself staring at a messy pile in my mudroom, wondering how to bring order to the chaos. That’s when I decided to take matters into my own hands and create show rack woodworking plans.
Building my own storage unit was not only practical but also incredibly rewarding. I used trusted resources like Kreg Tool and Fix This Build That to guide me through the process. Their step-by-step plans made it easy to design a functional and stylish shelf that fits perfectly in my space.
This project isn’t just about organizing footwear. It’s about transforming a cluttered area into a neat, inviting space. With the right tools and a bit of creativity, you can do the same. Let me show you how!
Key Takeaways
- Create a custom storage solution to organize your mudroom efficiently.
- Use trusted resources like Kreg Tool for step-by-step guidance.
- Design a functional and stylish shelf tailored to your space.
- Simplify clutter and bring order to your home with a DIY approach.
- Enjoy the satisfaction of building something practical and attractive.
Preparing for Your DIY Shoe Rack Project
Creating a custom storage solution was about more than just organization—it was about personal expression. Similarly to how I approached DIY shelf project. I wanted something that would not only tidy up my mudroom but also add a touch of style to the space. Here’s how I got started.
My Design Inspiration and Goals
My inspiration came from the need to maximize space without sacrificing aesthetics. I envisioned a sleek, functional design that could hold all my footwear while blending seamlessly with my home decor. My goal was to create something unique and that would work well with my custom woodworking business.
Gathering Materials and Essential Tools
To bring my vision to life, I gathered the following materials and tools. I focused on affordability and accessibility, ensuring everything was easy to find and budget-friendly.
| Materials | Tools |
|---|---|
| 1×6 and 2×2 boards | Circular saw |
| ¾” plywood | Kreg Pocket Hole Jig |
| Dowel rods (optional) | Drill/Driver |
| Wood screws | Brad Nailer |
Measuring and planning were crucial to the success of this project. I took the time to map out every cut and board placement to ensure a polished final look. Sourcing quality materials on a budget was a rewarding challenge, and I’m excited to share how I did it.
Thorough preparation is the key to achieving a sleek, custom mudroom look. With the right materials and tools, you’re ready to move on to the next step: building your DIY storage solution.
Shoe Rack Woodworking Plans: Step-by-Step Guide
Building a functional storage unit requires careful attention to detail from the very beginning. Whether you’re a seasoned DIY enthusiast or a beginner, this guide will walk you through the process of creating a custom solution for your mudroom. Let’s dive into the steps!
Measuring, Cutting, and Planning Your Boards
Start by measuring your space to determine the dimensions of your storage unit. Use a tape measure to mark the lengths on your boards. Accuracy here is crucial—double-check your measurements before making any cuts.
Next, use a circular saw to cut the boards according to your plan. If you’re new to using power tools, take your time and follow safety guidelines. Here’s a quick reference for the cut list:
| Board Type | Length |
|---|---|
| 1×6 boards | 39 inches |
| 2×2 boards | 36 inches |
| ¾” plywood | 34-5/8 inches |

Assembling the Frame and Installing Shelves
Once your boards are cut, it’s time to assemble the frame. Use a Kreg Pocket Hole Jig to create secure joints. This tool is a game-changer for DIY projects, ensuring professional results without expensive equipment.
Attach the vertical supports to the base, then add the shelves. Align each piece carefully and use clamps to hold them in place while you secure them with screws. This step ensures stability and durability for your storage unit.

Adding Custom Finishing Touches
Now comes the fun part—customizing your creation! Sand the surfaces to remove any rough edges, then apply a coat of wood conditioner if you’re using softwood. This prevents blotchiness when staining.
Choose a finish that matches your decor. Whether you prefer stain, paint, or a natural look, this is your chance to make the piece uniquely yours. Don’t forget to add tapered feet for stability and a polished final touch.
Customizing Your Shoe Rack for Personal Style
Personalizing your storage solution can transform it from functional to fabulous. Adding unique touches not only enhances its appearance but also makes it a perfect fit for your space. Here’s how I infused my project with style and personality.
Styling Your Mudroom with Unique Details
Small details can make a big impact. I added tapered feet to my unit for stability and a polished look. You can also incorporate decorative trim or carved patterns for a custom touch.
Another idea is to use dowel rods for a modern, open design. This not only looks sleek but also allows for better airflow. These little changes can turn a simple shelf into a statement piece.

Choosing Finishes: Stain, Paint, or Alternative Techniques
Selecting the right finish is crucial for both aesthetics and durability. I explored different options to find the perfect match for my mudroom decor. Here’s a quick comparison of popular finishes:
| Finish Type | Benefits |
|---|---|
| Stain | Enhances natural wood grain; durable |
| Paint | Offers a wide color range; easy to touch up |
| Shou Sugi Ban | Unique, charred look; highly durable |
I chose a stain to highlight the wood’s natural beauty. If you prefer a bold look, paint is a great option. For something truly unique, try shou sugi ban—a Japanese technique that creates a stunning, textured finish.
Customizing your project is all about making it reflect your style. Whether it’s through finishes or unique details, the possibilities are endless. With a little creativity, you can create a storage solution that’s both functional and beautiful.
Build Your Shoe Rack Project Today
Taking on a DIY project like this brings both functionality and a sense of accomplishment. Following a structured plan ensures that every step, from preparation to customization, contributes to a polished final result. It’s not just about solving storage issues—it’s about creating something uniquely yours.
Reflecting on my journey, I’m thrilled with how this piece transformed my mudroom. The process was rewarding, and the outcome perfectly fits my space. You can also check out my wine rack woodworking project for more ideas.
I encourage you to try this project for yourself. Organized spaces can reduce stress and improve productivity, making this effort well worth it. Share your creations and experiences—let’s build a community of DIY enthusiasts together!

FAQ
What materials do I need to start my DIY storage project?
You’ll need boards, screws, a saw, a drill, and sandpaper. I also recommend a measuring tape and a level for accuracy.
How do I decide on the right design for my mudroom organizer?
Think about your space and storage needs. I started by sketching my ideas and considering how many pairs I wanted to store.
What’s the best way to cut boards for a sturdy frame?
Measure twice and cut once! I used a circular saw for clean edges and double-checked my measurements before making any cuts.
Can I customize my organizer to match my home’s style?
Absolutely! I added a coat of paint and some decorative details to make mine fit perfectly with my mudroom’s aesthetic.
How do I ensure my shelves are level during assembly?
I used a level tool while attaching the shelves to the frame. It’s a simple step that makes a big difference in the final look.
What finishing techniques work best for a durable surface?
I prefer using a stain for a natural wood look, but paint or sealant can also protect your project and add a personal touch.