Did you know that over 70% of homeowners prefer DIY projects to add a personal touch to their spaces? Creating your own wood shelves is not only budget-friendly but also a rewarding way to enhance your home’s decor. I’ll share the practical woodworking shelf ideas that adds value to your home.
Furthermore, by using reclaimed materials, you can craft unique pieces that reflect your personality. In this article, I’ll share my top tips and step-by-step guides to help you create stunning wood shelves that fit your space perfectly. These can make for some amazing woodworking gift ideas.

Key Takeaways
- DIY wood shelves are affordable and customizable.
- Reclaimed materials add uniqueness to your projects.
- Thoughtful design ensures both style and durability.
- Step-by-step guides make the process easy to follow.
- Personalized shelves enhance your home’s decor.
Let’s Get Started
Blank walls are like blank canvases, waiting for your creative touch. With a little effort, you can turn these unused spaces into functional and stylish areas. DIY projects are a fantastic way to achieve this, offering both practicality and a personal touch.
I’ve always loved the idea of maximizing every inch of my home. A well-executed DIY project can transform a bare wall into a storage solution or a decorative focal point. It’s not just about saving space—it’s about making it work for you.
One of my favorite things about DIY is the ability to customize. Whether it’s the size, color, or design, you can create something that perfectly fits your needs and style. It’s a rewarding process that adds both functionality and personality to your home.
In the upcoming sections, I’ll share detailed guides and creative ideas to help you get started. From simple wall projects to more intricate designs, there’s something for everyone. Let’s turn those blank walls into something extraordinary!
Getting Started with DIY Wood Shelves
Starting a DIY project can feel overwhelming, but with the right materials and tools, it’s easier than you think. Whether you’re crafting a simple storage solution or a decorative piece, having the basics in place ensures a smooth process. Let’s break down what you’ll need and how to get started.
Materials Overview
Choosing the right material is key to your project’s success. Reclaimed wood, plywood, and common lumber are popular options. Each has its own unique look and benefits. For example, reclaimed wood adds character, while plywood is a budget-friendly option.
Here’s a quick comparison to help you decide:
| Material | Pros | Cons |
|---|---|---|
| Reclaimed Wood | Eco-friendly, unique texture | May require extra cleaning |
| Plywood | Affordable, easy to cut | Less durable than solid wood |
| Common Lumber | Strong, readily available | Heavier and more expensive |
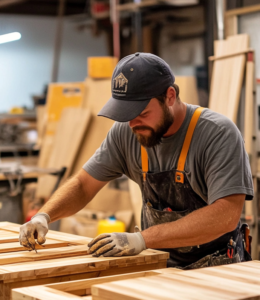
Include a photo to visualize your project. This can help you decide on the best material for your needs.

Essential Tools and Tips
Having the right tools makes all the difference. A circular saw, drill, and level are must-haves. These tools ensure precise cuts and secure installations. Don’t forget safety gear like gloves and goggles!
Here are some practical tips to keep in mind:
- Source materials from hardware stores, salvage yards, or online platforms.
- Measure twice, cut once. This ensures accuracy and minimizes waste.
- Sand the edge of your boards for a smooth, polished finish.

“A well-prepared workspace is half the battle. Take your time to gather everything you need before starting.”
With these tips and tools, you’re ready to tackle your DIY project with confidence. Happy building!
Choosing the Right Materials and Tools for Shelving
Selecting the right materials and tools is the foundation of any successful DIY project. Whether you’re crafting a simple wall shelf or a more intricate piece, the choices you make will impact both functionality and style. Let’s dive into the options and considerations to help you create something that fits your home perfectly.

Wood Options and Alternatives
When it comes to materials, wood is a classic choice. Maple and oak are particularly popular due to their strength and aesthetic appeal. These hardwoods are durable and can handle heavy loads, making them ideal for room storage solutions. However, they can be pricier than other options.
If you’re looking for a budget-friendly alternative, consider MDF or plywood. These materials are lightweight and easy to work with, though they may not be as durable as solid wood. For a unique touch, upcycled materials like reclaimed wood can add character to your piece while being eco-friendly.
Here’s a quick breakdown of popular materials:
- Maple/Oak: Strong, durable, and visually appealing.
- MDF: Affordable and easy to cut, but less sturdy.
- Reclaimed Wood: Eco-friendly with a rustic charm.
“The right material not only supports your shelf but also enhances the overall look of your space.”
When choosing materials, think about the room where the shelf will be placed. For example, moisture-resistant options like treated wood are great for bathrooms, while sturdy hardwoods work well in living rooms. Don’t forget to consider weight capacity and cost efficiency to ensure your project is both practical and affordable.
Finally, match your tools and hardware to the material you choose. A circular saw and drill are essential for cutting and assembling, while the right brackets and screws ensure your wall shelf stays securely in place. With the right materials and tools, you’re well on your way to creating a functional and stylish addition to your home.
Designing Your Wall Shelf for Function and Style
Creating a wall shelf that balances function and style starts with careful planning. It’s not just about adding storage—it’s about enhancing your space with a piece that reflects your personality. Whether you’re working with a small nook or a large wall, the right design can make all the difference.

Measuring Your Space
Before you start, measure your wall space accurately. Use a tape measure to note the height, width, and depth of the area. This ensures your shelf fits perfectly and doesn’t overwhelm the room. If you’re mounting to studs, a stud finder is essential for secure installation.
Here’s a quick guide to measuring:
- Measure the wall area where the shelf will go.
- Mark the stud locations for secure mounting.
- Consider the height of the shelf for easy access and visual appeal.

Planning the Shelf Layout
Once you have your measurements, plan the layout. Think about how you’ll use the shelf—will it hold books, decor items, or both? Spacing is key. Leave enough room between shelves to accommodate taller items like vases or plants.
Here’s a comparison of popular layouts:
| Layout | Best For | Tips |
|---|---|---|
| Evenly Spaced | Uniform look | Great for displaying books or small decor. |
| Varied Heights | Visual interest | Use for a mix of tall and short items. |
| Floating | Modern style | Install with hidden brackets for a sleek look. |
Decorative brackets can add a unique touch to your design. Choose ones that match your room’s style—whether it’s rustic, modern, or minimalist. A well-placed bracket not only supports the shelf but also enhances its overall appeal.
“A shelf is more than storage—it’s a statement piece that ties the room together.”
Finally, consider the dual role of your shelf. It’s both a functional storage solution and a decorative element. Use a mix of textures, colors, and shapes to create a visually appealing display. For example, pair neutral decor items with natural elements like dried flowers or greenery for a warm, inviting look. It’s one of the easier woodworking project ideas.
Step-by-Step Guide to Building Your Wood Shelf
Building your own storage solution is easier than you might think, and it’s a great way to add personality to your space. Whether you’re creating a simple frame or a more intricate design, following a clear process ensures success. Let’s dive into the steps to craft a sturdy and stylish piece.

Planning and Cutting the Boards
Start by measuring your space and determining the size of your shelving. Use a tape measure to note the height, width, and depth. This ensures your shelf fits perfectly and serves its purpose. Once you have the measurements, mark the boards for cutting.
Use a circular saw for precise cuts. Always double-check your measurements before cutting to avoid mistakes. Safety is key—wear gloves and goggles to protect yourself during this step.
Assembly and Finishing Touches
Next, assemble the frame by aligning the boards and securing them with screws. A drill makes this process quick and easy. Ensure the structure is level and stable before moving on to the finishing touches.
Sand the edges for a smooth finish, then apply a coat of beeswax or stain. This not only enhances the look but also protects the wood. Finally, position your shelf in a way that optimizes both storage and display functions.
“Taking your time during assembly ensures a sturdy and long-lasting shelf.”
With these steps, you’ll have a functional and stylish addition to your home. Happy building!
Mastering Shelf Installation: Brackets & Mounting Techniques
Proper installation is the key to ensuring your shelves are both sturdy and stylish. Whether you’re working in a bathroom, kitchen, or living area, the right techniques ensure your shelves stay secure and enhance the look of your space. Let’s dive into the essentials of mounting your shelves like a pro.

Selecting Strong Brackets
Choosing the right brackets is crucial for stability. I always recommend heavy-duty metal brackets for their durability and strength. They can handle heavier loads, making them ideal for spaces like the kitchen or bathroom where shelves often hold bulky items.
Here’s what to consider when selecting brackets:
- Weight capacity: Ensure they can support the items you plan to store.
- Style: Match the brackets to your room’s decor for a cohesive look.
- Material: Opt for metal for durability or decorative options for added flair.
Stud Finding and Precise Mounting
Locating wall studs is essential for secure mounting. I always use a stud finder to identify the strongest points in the wall. This step is especially important for heavier shelves or those in high-traffic areas like the kitchen. It’s a similar concept to what I share with my woodworking workbench plans.
Once you’ve found the studs, use a level to ensure your brackets are perfectly aligned. Here’s my step-by-step process:
- Mark the stud locations with a pencil.
- Hold the bracket in place and use a level to check alignment.
- Secure the bracket with screws, ensuring it’s tightly fastened.
“Taking the time to mount your shelves correctly ensures they’ll stay secure and look great for years.”
If you encounter issues like uneven walls, use shims to level the brackets. This small adjustment can make a big difference in the final look and functionality of your shelves. With these tips, you’ll master the art of shelf installation and create a space that’s both practical and stylish.
Displaying and Organizing Your DIY Shelf Space
Transforming your DIY shelf into a stylish centerpiece is easier than you might think. With a few creative touches, you can turn it into a functional and eye-catching part of your room. Whether you’re working with a small nook or a large wall, the right approach can make all the difference.
Styling Tips for Various Decor
Start by considering the size of your shelf and the items you want to display. A larger board can hold a lot of decor, while a smaller one works better for minimalistic setups. Matching the shelf bracket style to your room’s theme adds a cohesive touch.
Here are some ideas to inspire your shelf design:
| Theme | Styling Tips |
|---|---|
| Minimalist | Use odd-numbered groupings of small items like vases or candles. |
| Rustic | Incorporate natural elements like dried flowers or wooden decor. |
| Modern | Opt for sleek, monochromatic items and geometric shapes. |
Arranging items like plants, books, and collectibles can create a balanced display. For example, place taller items on one side and shorter ones on the other to maintain visual harmony. Seasonal changes, like swapping out photos or frames, can keep your shelf fresh and relevant.
When styling, consider the available space and intended use. A shelf in the kitchen might hold spices and cookbooks, while a living room shelf could showcase family photos and decorative pieces. The key is to make it both functional and visually appealing.
“A well-styled shelf is more than storage—it’s a reflection of your personality and creativity.”
With these tips, you can turn your DIY shelf into a focal point that enhances your space. Happy styling!
Incorporating Upcycled and Custom Materials in Your Shelves
Upcycling materials for DIY projects is a creative way to add personality to your home while being eco-friendly. I’ve always loved the idea of giving old items a new life, especially when they can serve a practical function. Using reclaimed wood and other unique materials not only adds character to your space but also supports sustainable practices.
Using Reclaimed Wood and Unique Materials
One of my favorite projects involved transforming an old dresser drawer into a stylish wall unit. The process was simple yet rewarding. I sanded the wood, applied a fresh coat of paint, and added decorative brackets for support. The result was a functional and attractive piece that perfectly fit my living room.
Here’s a comparison of different upcycled materials you can use:
| Material | Benefits | Challenges |
|---|---|---|
| Reclaimed Wood | Unique texture, eco-friendly | May require cleaning and sanding |
| Old Furniture | Ready-made structure, vintage charm | Limited size options |
| Salvage Items | Creative potential, low cost | May need repairs |
Using these materials not only saves money but also allows you to create one-of-a-kind pieces. For example, I once used an old ladder as a bookshelf. It added a rustic touch to my home and became a conversation starter.
“Upcycling is more than a trend—it’s a way to live sustainably while expressing your creativity.”
When working with upcycled materials, it’s important to ensure they’re sturdy and safe. Sand rough edges, secure loose parts, and use the right hardware for mounting. These small steps can make a big difference in the durability and function of your project.
By incorporating upcycled materials, you’re not just creating a storage solution—you’re telling a story. Each piece has a history, and now it’s part of your home. Whether it’s a reclaimed wood shelf or a repurposed ladder, these projects add both visual interest and practical value to your space.
woodworking shelf ideas: Elevate Your Home Storage
Choosing between floating and fixed shelves can transform the way you use and enjoy your space. Both options have their unique benefits, and understanding their differences helps you make the best choice for your home. Whether you’re aiming for a modern look or a classic feel, the right style can enhance both functionality and aesthetics.
Floating Shelves: A Modern Touch
Floating shelves are a popular choice for their sleek, minimalist design. They create the illusion of a lengthier wall space, making rooms feel more open. I often choose floating shelves for modern interiors because they add a clean, uncluttered look.
Here are some key advantages:
- They provide a seamless appearance with hidden brackets.
- Perfect for displaying lightweight decor items like plants or frames.
- Easy to install with the right screw techniques.
Fixed Shelves: Classic and Sturdy
Fixed shelves, on the other hand, are known for their durability and strength. They’re ideal for heavier items like books or kitchenware. I recommend them for spaces where stability is a priority, such as a cabinet or pantry.
Here’s why fixed shelves work well:
- They can support more weight due to visible brackets.
- Great for adding warmth to traditional or rustic designs.
- Simple to install with basic tools and screws.
Installation Tips for Both Styles
Proper installation ensures your shelves are both secure and visually appealing. For floating shelves, I use hidden brackets to maintain the clean look. For fixed shelves, sturdy brackets and screws are essential to handle the weight.
Here’s a quick comparison of installation techniques:
| Type | Installation Method | Best For |
|---|---|---|
| Floating | Hidden brackets, precise measurements | Modern, minimalist spaces |
| Fixed | Visible brackets, heavy-duty screws | Traditional, functional areas |
“The right shelf style not only adds storage but also enhances the overall feel of your room.”
When deciding between floating and fixed shelves, consider the room’s purpose and your design goals. Both options can elevate your home storage while adding a touch of personality. Happy decorating!
Customizing Shelf Solutions for Every Room
Every room in your home deserves a storage solution that’s both functional and stylish. Whether it’s a kitchen, bathroom, or living room, customizing your shelves can transform the space. Tailored designs not only enhance the appearance but also provide the necessary support for your items.
Kitchen, Bathroom, and Living Room Ideas
In the kitchen, a floating shelf can be a game-changer. It’s perfect for storing spices, cookbooks, or decorative jars. I love using moisture-resistant materials in bathrooms to ensure durability. For living rooms, longer shelves (24-30 inches) work well to display books, plants, and decor cohesively.
Here’s a quick comparison of shelf ideas for different rooms:
| Room | Idea | Tip |
|---|---|---|
| Kitchen | Floating shelves for spices | Use stainless steel for a modern look. |
| Bathroom | Moisture-resistant shelves | Add LED lighting for ambiance. |
| Living Room | Longer shelves for decor | Mix textures for visual interest. |
Personalizing with Decor Accents
Adding decor accents is a great way to make your shelves unique. I often use plants, framed photos, or small sculptures to create a balanced display. Seasonal changes, like swapping out decor items, keep the space fresh and relevant.
Here are some tips for styling your shelves:
- Use odd-numbered groupings for a cohesive look.
- Incorporate natural elements like dried flowers.
- Add LED lighting to highlight key items.
“A well-styled shelf is more than storage—it’s a reflection of your personality and creativity.”
By customizing your shelves, you can create a space that’s both practical and visually appealing. Whether it’s a floating shelf in the kitchen or a decorative display in the living room, the possibilities are endless. Happy decorating!
FAQ
What materials do I need to start building a DIY wall shelf?
You’ll need wood boards, brackets, screws, a drill, a level, and sandpaper. For a custom touch, consider using reclaimed wood or metal accents.
How do I choose the right wood for my shelf?
Look for sturdy options like pine, oak, or plywood. If you want a rustic look, reclaimed wood adds warmth and character to your space.
What’s the best way to measure my space before building a shelf?
Use a tape measure to determine the length, width, and height of the area. Always account for brackets and leave enough room for decor or storage items.
Should I use floating shelves or fixed ones?
Floating shelves give a modern, sleek appearance, while fixed shelves with brackets offer more support for heavier items. It depends on your style and function needs.
How do I ensure my shelf is securely mounted?
Use a stud finder to locate wall studs and anchor your brackets with sturdy screws. Double-check with a level to ensure it’s straight.
Can I customize shelves for different rooms?
Absolutely! In the kitchen, use them for spices or cookbooks. In the bathroom, they’re great for towels and toiletries. In the living room, display photos or books for a personal touch.
What’s the best way to style my DIY shelf?
Mix functional items like books with decorative accents like plants or frames. Keep it balanced and visually appealing by varying heights and textures.
Can I use upcycled materials for my shelf project?
Yes! Reclaimed wood, old doors, or even metal pipes can create unique, eco-friendly shelving solutions that add character to your home.
How do I add a finished look to my shelf?
Sand the edges for smoothness, then stain or paint the wood to match your decor. Adding a clear sealant can protect the surface and enhance its appearance.
What’s the easiest way to cut wood boards for shelves?
Use a circular saw or have the boards cut at your local hardware store. Always measure twice and cut once to ensure accuracy.