Did you know that over 70% of DIY enthusiasts feel more satisfied with their home when they create their own furniture? I’ve always been passionate about crafting unique pieces that reflect my personal style. That’s why I’m excited to share proven end table woodworking plans that can transform your living space.
Whether you’re a beginner or an experienced builder, these step-by-step instructions are designed to make the process easy and enjoyable. Each project includes detailed photos, diagrams, and a complete list of materials and tools. You’ll be amazed at how simple it is to build a stylish side table that complements your living room decor.
Ready to start your DIY journey? Let’s dive into this comprehensive guide and explore how you can craft functional, beautiful furniture that’s uniquely yours.
Key Takeaways
- Step-by-step instructions make building easy for all skill levels.
- Detailed photos and diagrams guide you through each project.
- Customizable designs blend modern, rustic, and timeless styles.
- Create matching pieces to enhance your living room decor.
- Affordable materials and tools make DIY projects budget-friendly.

Introduction to My DIY End Table Journey
There’s something magical about building furniture that fits your home perfectly. My journey into DIY furniture started with a simple end table project. I wanted something unique that matched my living room decor, and store-bought options just didn’t cut it. That’s when I decided to take matters into my own hands.
Why I Love Building Custom Furniture
Creating custom pieces has become my favorite way to personalize my space. It’s not just about the final product—it’s about the process. Every cut, every measurement, and every finish choice feels like I’m adding a piece of myself to my home.
One of the best parts? You can tailor every detail to your liking. From the dimensions to the finish, your end table can be as unique as your style. overall, it makes for one of the better wood gift ideas.
Benefits of Creating Your Own End Tables
Building your own furniture comes with so many advantages. First, it’s cost-effective. You can choose materials that fit your budget without compromising on quality. Second, it’s incredibly rewarding. There’s nothing like stepping back and admiring a piece you built from scratch.
Here’s a quick breakdown of the tools and materials I use for most projects:
| Tool | Material |
|---|---|
| Table Saw | Plywood |
| Router | Solid Wood |
| Drill | Finishing Products |
Every project has taught me something new, and I’ve ended up with a collection of functional, beautiful furniture that I’m proud to show off. If you’re looking to transform your home, I highly recommend giving DIY a try. The detailed plans and creative ideas ahead will guide you every step of the way.
End Table Woodworking Plans
Creating custom furniture has opened up a world of possibilities for my home decor. Over the years, I’ve explored a variety of end table woodworking plans that cater to different styles and skill levels. Whether you’re looking for a sleek modern end table or a rustic side table, there’s a plan out there for you.

An Overview of Available Designs
One of the best parts of DIY projects is the variety of designs you can choose from. From midcentury modern to farmhouse styles, each plan offers something unique. I’ve found that detailed diagrams and step-by-step instructions make the process much easier, especially for beginners.
Here’s a quick look at some popular design styles:
| Style | Key Features |
|---|---|
| Modern | Clean lines, minimalist design |
| Midcentury Modern | Tapered legs, organic shapes |
| Rustic | Reclaimed wood, distressed finishes |
Techniques I’ve Found to Be Most Effective
Over time, I’ve learned that certain techniques can make a big difference in the success of a project. Accurate measurements and quality wood selection are essential. I also recommend starting with simpler designs if you’re new to building furniture.
Here are a few tips that have worked well for me:
- Use detailed diagrams to guide each step.
- Choose materials that match your skill level.
- Adapt plans to fit your available space and tools.
By following these techniques, you can create a beautiful and functional piece that enhances your room decor.

Top DIY End Table Ideas for Every Style
Transforming your space with DIY furniture is a rewarding way to express creativity. Whether you’re drawn to sleek modern designs or cozy rustic vibes, there’s a style for every home. Let’s explore some of my favorite ideas that can elevate your room decor.
Modern, Mid-Century, and Contemporary Options
If you love clean lines and minimalist aesthetics, modern end tables are perfect for you. Think smooth surfaces, geometric shapes, and neutral tones. A midcentury modern design with tapered legs can add a retro yet timeless touch to your space.
For a more contemporary look, experiment with mixed materials like glass and metal. These designs often feature bold colors or unique textures, making them stand out in any room.
Rustic, Farmhouse, and Industrial Inspirations
Rustic and farmhouse styles bring warmth and charm to your decor. Reclaimed wood, distressed finishes, and natural textures are key elements. These pieces often feel handmade, adding a personal touch to your space.
Industrial designs combine metal and wood for a rugged yet stylish look. Think pipe frameworks or repurposed materials. These tables are not only functional but also conversation starters.
Here’s a quick comparison of these styles:
| Style | Key Features |
|---|---|
| Modern | Clean lines, minimalist design |
| Midcentury Modern | Tapered legs, organic shapes |
| Rustic | Reclaimed wood, distressed finishes |
| Farmhouse | Natural textures, handmade feel |
| Industrial | Metal and wood, rugged aesthetic |
No matter your preference, these DIY ideas allow you to create a piece that reflects your personality. Start with a plan that suits your skill level and enjoy the process of bringing your vision to life.
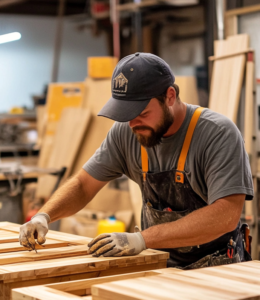
Step-by-Step Guide to Building Your End Table
Building your own furniture is a fulfilling way to add personality to your space. I’ve found that having a clear plan and the right tools makes the process smooth and enjoyable. Whether you’re crafting a side table or a modern end piece, this guide will walk you through every step.

Essential Tools and Materials I Use
Before starting any project, it’s important to gather everything you’ll need. Here’s my go-to list of tools and materials:
- Table saw or circular saw
- Drill and drill bits
- Wood screws (2 ½ inches)
- Sandpaper or sander
- Wood glue and clamps
- Measuring tape and square
- Wood stain or paint
For materials, I recommend using ¾-inch plywood or solid wood. These are durable and easy to work with. Always double-check your measurements to ensure precision.
Instructions, Diagrams, and Pro Tips
Once you have your tools and materials ready, it’s time to start building. Follow these steps for a successful build:
- Plan and Measure: Sketch your design and mark all cuts on the wood. Use a square to ensure straight lines.
- Cut the Pieces: Carefully cut the wood according to your measurements. A table saw works best for clean edges.
- Assemble the Frame: Use wood screws and glue to attach the legs and frame. Drill pilot holes to prevent splitting.
- Add the Top and Shelf: Secure the top and any additional shelves using screws. Ensure everything is level.
- Finish the Piece: Sand all surfaces and apply your chosen finish. Let it dry completely before use.
Here are a few pro tips I’ve learned along the way:
- Use a Kreg jig for strong, hidden joints.
- Always sand between coats of finish for a smooth result.
- Visualize the final product using SketchUp or similar software.
With patience and attention to detail, you’ll have a beautiful, custom piece that enhances your space. Enjoy the process and take pride in your creation!

Customization Tips and Style Options
Personalizing your furniture is one of the most rewarding aspects of DIY projects. It’s your chance to create something that truly reflects your personality and complements your home decor. Whether you’re crafting a modern end piece or a rustic side table, a few thoughtful tweaks can make all the difference.
Personalizing Your End Table Design
One of my favorite ways to customize a plan is by altering the base or legs. For example, swapping out standard legs for tapered or hairpin ones can instantly modernize the look. Adding a drawer or shelf can also enhance functionality, giving you extra storage space.
Here are a few ideas to inspire your next project:
- Experiment with unique shapes, like a circular or hexagonal top.
- Use reclaimed wood for a rustic, eco-friendly vibe.
- Incorporate mixed materials, such as metal accents or glass panels.
Choosing Finishes and Colors That Pop
The finish you choose can completely transform the character of your piece. For a sleek, modern end table, consider a high-gloss paint or a rich stain. If you’re going for a rustic feel, a distressed or weathered finish works beautifully.
Here’s a quick guide to selecting the right finish:
| Style | Finish |
|---|---|
| Modern | High-gloss paint, matte stain |
| Rustic | Distressed, weathered |
| Industrial | Metallic, matte black |
Don’t be afraid to experiment with bold colors or unique textures. A splash of color can turn a simple side table into a statement piece. Remember, the goal is to create something that feels uniquely yours. For more ideas, check out my bench plans for woodworking projects.
Expert Advice and Woodworking Resources
Exploring expert resources has transformed my DIY journey, making every project more efficient and enjoyable. Whether you’re crafting a side table or tackling a larger project, learning from professionals can save time and elevate your skills. Here are some of the best resources I’ve found to help you succeed.

Online Courses and Community Insights
One of the most valuable tools I’ve discovered is online courses. Platforms like I Planned That™ offer detailed plans, 3D renderings, and shopping lists that simplify the process. These courses are perfect for beginners and advanced builders alike.
Here are my top recommendations:
- I Planned That™: Comprehensive tutorials with printable plans and step-by-step instructions.
- Woodworking for Beginners: A great starting point for mastering basic techniques.
- Advanced Furniture Design: Perfect for those looking to tackle more complex projects.
Joining online communities has also been a game-changer. Forums and social media groups provide tips, feedback, and inspiration from fellow DIY enthusiasts. It’s a great way to connect and learn from others’ experiences.
Recommended Magazines and Blogs for Inspiration
Magazines and blogs are another excellent source of ideas. They often feature innovative designs, expert tips, and detailed plans that can spark your creativity. Here are a few of my favorites:
- Fine Woodworking: Offers in-depth articles and tutorials for all skill levels.
- Popular Woodworking: A go-to resource for project ideas and techniques.
- The Wood Whisperer: A blog that combines humor with practical advice.
These resources have helped me refine my techniques and discover new ways to approach DIY projects. Whether you’re looking for storage solutions or unique side table designs, these magazines and blogs are a treasure trove of inspiration.
By leveraging these expert resources, you can unlock your full DIY potential and create pieces that enhance your home. Start exploring today and see how much you can achieve!
Enhancing Functionality with Storage Solutions
Adding storage to your furniture doesn’t just solve clutter—it transforms how you use your space. Whether you’re crafting a side table or a nightstand, integrating smart storage solutions can make your piece both stylish and practical. I’ve found that even small additions, like a table drawer, can have a big impact on functionality.

Incorporating Drawers for Added Utility
One of my favorite ways to enhance a DIY side table is by adding drawers. They’re perfect for stashing remotes, books, or other small items. I’ve used simple plans to adapt standard designs, ensuring the drawer fits seamlessly into the overall look.
Here’s how I approach it:
- Measure the interior space to determine the size of the drawer.
- Use durable wood for the drawer box and a smooth-gliding track for easy access.
- Finish the drawer front to match the table’s style, whether it’s rustic or modern.
Adding a drawer not only increases storage but also keeps your home organized and clutter-free.
Design Ideas for Maximizing Living Space
In smaller spaces, every inch counts. I’ve experimented with designs that include hidden compartments or shelves to maximize utility. For example, a side table with a lower shelf can hold baskets or books, while a tabletop drawer keeps essentials within reach. There are many DIY woodworking plans you can try.
Here are a few creative ideas:
- Use vertical space by adding a shelf or cubby beneath the table.
- Incorporate a sliding panel or hidden compartment for discreet storage.
- Choose legs that double as storage, like hollow metal tubes.
These solutions not only save space but also add a unique touch to your DIY project. By merging style and function, you can create furniture that’s as practical as it is beautiful.
Conclusion
Crafting my own furniture has been a game-changer for my home. From modern to rustic designs, each piece reflects my personal style and adds a unique touch to my space. Following a detailed plan made the process smooth and enjoyable, even for a beginner like me.
One of my favorite parts is the ability to customize. Adding a drawer or adjusting the size can transform a simple side piece into a functional masterpiece. The step-by-step guides and expert resources I’ve used have been invaluable in every project.
I encourage you to start your own DIY journey. Whether it’s a sleek modern piece or a cozy rustic design, the satisfaction of creating something uniquely yours is unmatched. Share your experiences in the comments—I’d love to hear which style you’re excited to try!
FAQ
What are the benefits of building my own custom furniture?
Crafting your own pieces allows you to tailor designs to fit your space perfectly. It’s also a rewarding way to express creativity and save money compared to store-bought options.
What styles can I create with DIY end tables?
You can explore a variety of looks, from modern and mid-century to rustic and farmhouse. The possibilities are endless, depending on your taste and decor.
What tools and materials do I need to get started?
Basic tools like a saw, drill, and sander are essential. Materials often include wood, screws, and finishes. I always recommend starting with a detailed plan to ensure success.
How can I add storage to my end table?
Incorporating drawers or shelves is a great way to enhance functionality. I’ve found that even small additions can make a big difference in maximizing space.
Where can I find inspiration for my projects?
I love browsing magazines like *Woodsmith* and blogs like *Ana White*. Online communities and courses also offer fantastic ideas and step-by-step guidance.
Can I customize the finish of my end table?
Absolutely! Stains, paints, and sealants let you match your piece to your room’s aesthetic. Experimenting with colors can really make your design pop.
Are there beginner-friendly designs available?
Yes, many plans cater to beginners. Simple designs like a crate-style or round side table are great starting points to build confidence.